ELECTRIC CIRCUITS
I. Qualitative investigation of series and parallel circuits
An electric circuit consists of a completer closed path (or paths) for electric current. A "series" circuit has only one path for the electricity to follow. A "parallel" circuit has two or more paths for the electricity.
You will first wire a simple circuit which will allow you to test materials for conductivity. Next some circuits will be wired to demonstrate the effects of series and parallel circuits on components in the circuit.
PROCEDURE:
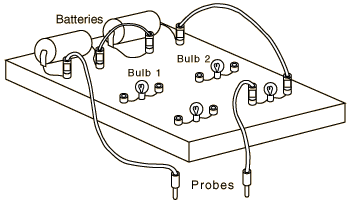
1. Connect your circuit board as indicated in the figure and note that the bulb will light when you touch the probes together.
2. Touch the ends of another loose wire with the probes. Note that the bulb lights brightly. This is an indication of good electrical conductivity since the current through the bulb is directly related to brightness.
3. Test several other items and record your results. Include a coin, your skin, and a beaker of water. Be sure that the probes a re in contact with the material being measured but not with each other. List the materials tested and your conclusions about their conductivity.
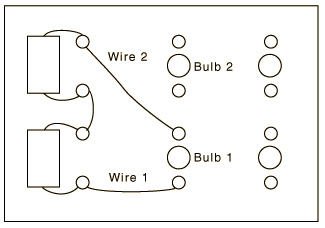
4. Rewire the circuit as shown in the diagram below. Is this a series or parallel circuit?
|
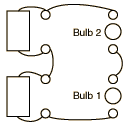
5. Now remove wire #2 and connect it to bulb #2. Connect another wire from bulb #2 to bulb #1. The figure illustrates the circuit. How does the brightness of each bulb compare with that of the bulb in procedure step 4. Why is it different? Unscrew one bulb. What happens and why? |
 |
|
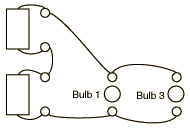
6. Wire the circuit shown. Show on the diagram or on a sketch the path(s) of current flow. Is this a series or parallel circuit? Unscrew one bulb. Describe what happens and why. |
 |
II. Quantitative investigation of voltage, current, and Ohm's law.
Electric current is the flowrate of electric charge and is measured in amperes. The current transports electrical energy along conductors. Voltage (V) is a measure of energy per unit charge between two points in the circuit. One may think of voltage as the effective "pressure difference" which causes the current to flow. Resistance (R) is the opposition to current flow and is measured in ohms. In practice, resistors take the form of light bulbs, toasters, heaters and other devices which use electrical energy to perform useful tasks as well as the undesirable form of resistance in electrical wiring that transports the electrical energy to you.
Ohm's Law will be utilized in this laboratory exercise to determine the voltage, current, or resistance in a circuit. Ohm's law simply states that the current in a circuit is directly proportional to the voltage and inversely proportional to the resistance in the circuit:
or in symbol form
Symbols and instrumentation: The following symbols will be used in the circuit diagrams.

|
A wire offers essentially zero resistance in most practical circumstances. The "battery" will be a connection on the laboratory tables to a central DC electric supply. The same laboratory meter will be used for both the ammeter and voltmeter functions. You will need to select the correct function with the selector switch. |
An ammeter will always be wired in series in a circuit. Failure to do this will result in blown fuses or damaged meters. Recall that the current has only one path to flow in a series connection, so the ammeter measures the current that flows through the circuit elements which are in series with it. The ammeters to be used will measure in milliamperes or 10-3 amperes.
A voltmeter is always wired in parallel with the circuit elements it is testing and measures the voltage change across them.
PROCEDURE:
(Proper labeling of the circuit diagrams is part of your report.)
A. Ohm's Law
1. Wire up the circuit as shown with the ammeter in place, observing the correct polarities. Set your meter selector switch for DC milliamperes. The "battery" in this case will be the round Flex Lab receptacles on your lab table which are connected to a DC power supply - DO NOT APPLY POWER until the circuit has been approved by the instructor.
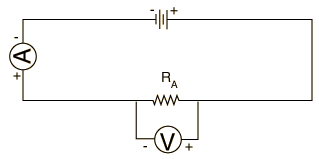
2. After approval, apply power by connecting the wires to the DC receptacles and record the ammeter reading in milliamperes. Repeat the current measurement each of the other resistors by placing them in the circuit in place of the first one.
3. Disconnect the power leads and remove the ammeter from the circuit. Switch it to DC volts and connect it in parallel across the resistor. Reconnect the DC voltage and measure the voltage across the resistor. Repeat for the other resistors.
4. You now have voltage and current measurements for each resistor. Use Ohm's law to calculate the resistance for each resistor and compare the calculated value obtained from the labeling on the resistor or from the color code on the resistor.
B. Distribution of Current.
1. Form the series circuit shown below. Since you will again be using the meter as an ammeter, reset its selector switch to DC milliamperes. Make sure it is correct before applying power.
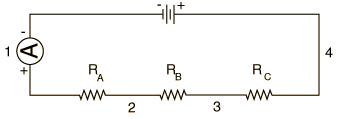
2. Wire the ammeter successively in locations 1,2 3 and 4 and record the current value in each location. Note that conventional current is taken to be clockwise in this circuit, while the electrons will be circulating counterclockwise. What can you conclude about the current in a series circuit from your measurements?
C. Distribution of Voltage
The circuit wired in Part B will now be used to measure voltages. The connections illustrated below will be used, but since you will be using the same meter for an ammeter and a voltmeter, the ammeter will not be in place when you are measuring the voltages.
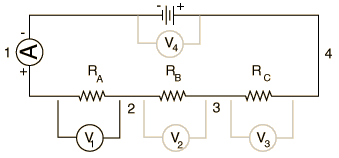
1. Measure the voltage across each resistor in turn and across the entire circuit, as indicated by V4. Record the results.
2. Compare the sum of voltages across the individual resistors to the voltage across the entire circuit. What can you conclude about the voltage in a series circuit?
3. Use the voltages across each resistor obtained in Step 1 above and the currents obtained from Section B above, along with Ohm's Law, to obtain values for the individual resistances. Compare the values with the given values for the resistors.
4. From the total voltage measured in Step 1 and the total current measured in Section B, calculate the equivalent resistance of the entire circuit composed of the three resistors in series. Compare this result with the sum RA + RB + RC.
QUESTIONS:
1. What functions does a wire serve? Are there insulators associated with your apparatus? What do they do?
2. What, if anything, flows through the wires?
3. Why must there be two connections to a battery and to a light bulb?
4. If you have a 120 volt appliance and 2 amperes of current flow through it, what is the power used by it in watts? What is its resistance in ohms?
5. Why are your household receptacles wired in parallel rather than in series?
Apparatus movie